Best Practices
IT Asset Tagging Best Practices for Small IT Teams (Laptop + Peripheral QR Guide)
Use this small-team QR tagging guide to standardize laptop and peripheral labels, naming rules, kit tracking, and audit-ready verification.
TL;DR
- Use this page for laptop and peripheral QR tagging rules in small IT teams, not for broad industrial label-engineering decisions.
- Standardize asset IDs, keep peripherals in clear kit logic, and verify tags during regular audit sessions.
- Use the broader placement guide only when you need material, size, or mixed-environment label decisions.
Keep this page focused on laptop and peripheral tagging workflow, naming, kits, and verification rather than broad physical-label engineering.
- IT Asset Management Hub (Small IT Teams) · hub overview
- QR Code Tag Placement, Durability, and Size (Physical Label Guide) · related article
- Offboarding Equipment Return Checklist (Laptops + Peripherals) · related article
- IT Asset Audit Checklist for Small IT Teams (60-Minute Runbook) · related article
Audience: Small IT teams tagging laptops, docks, chargers, and employee kits
First 7 Days IT Asset Tracking Implementation · guide
QR Label Configuration · feature page
If your team is tagging laptops, docks, chargers, and adapters, the goal is not just to print QR labels. The goal is to create a tagging workflow that keeps ownership clear, peripherals attached to the right kits, and audits fast enough for a small IT team to maintain.
This guide is for tagging laptops and peripherals for small IT teams. It’s not for warehouse stock, consumables, or reordering workflows.
If you need the broader physical-label guide for material choice, QR size, and surface durability across many environments, use: Tagging Best Practices: QR Code Placement, Durability, and Size.
TL;DR
- Use this page for small-team tagging workflow rules, not for broad industrial label engineering.
- Put QR labels where laptops and peripherals can be scanned fast during handoffs and audits.
- Use a short, stable asset ID on the tag and verify it quarterly so labels and records stay aligned.
Buyer Confidence Snapshot (Tagging Rollout)
- Best fit: teams with recurring laptop/peripheral handoffs
- Rollout speed: tag + baseline register can be started in a few working days
- Operational result: faster verification during audit sessions
- Risk reduction: fewer missing accessories during offboarding and returns
Start here:
- Hub: IT Asset Management Hub
- Template: IT Asset Register Template (CSV)
- Verification: IT Asset Audit Checklist (for Small IT Teams)
What This Page Covers vs the Broader Label Guide
Use this page when you need:
- laptop and peripheral tagging rules
- small-team naming and kit logic
- audit-friendly placement for office IT assets
- a rollout that works with existing employee device workflows
Use the broader placement guide when you need:
- QR material selection by environment
- code size guidance by scanning distance
- outdoor, workshop, medical, or chemical-resistance considerations
- long-term durability testing across many asset types
What a Tag Should Contain (Keep It Simple)
A tag should identify the asset, not expose it.
Recommended:
- Asset ID (e.g.,
IT-0123) - Optional: a short internal prefix (
QR-0123)
Avoid printing:
- employee names
- emails
- purchase cost
- anything that creates privacy or security risk
If you need tight access controls, use RBAC and audit trails: Role-Based Permissions in Inventory Systems.
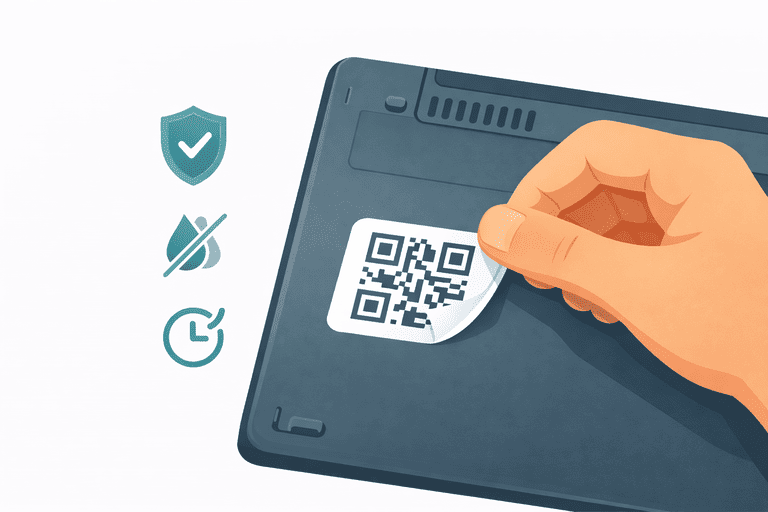
QR Placement Rules for Laptops (Office IT Workflow)
Good placement is:
- visible without opening the laptop
- not on a curved edge that peels
- not on a heat vent
- not on a surface that gets wiped constantly
Practical placements:
- underside (flat area, away from vents)
- palm rest corner (if you can avoid wear)
- near hinge area (if flat and not moving)
Avoid:
- edges and corners (peel first)
- textured surfaces (poor adhesion)
- areas that get hot (adhesive fails)
For the full physical-label guide on size, material, contrast, and durability, see: Tagging Best Practices: QR Code Placement, Durability, and Size.
Peripherals: Treat Them Like First-class Assets (or a Kit)
Peripherals are where money leaks:
- docks
- chargers
- adapters
- spare keyboards/mice
Two workable approaches:
- Tag them as separate assets (best long-term)
- Track them as part of a kit (laptop + peripherals) and verify at offboarding
Offboarding checklist: Offboarding Equipment Return Checklist.
30-Minute Tagging Rollout for Small IT Teams
Use this when you need to start tagging this week instead of planning a large project.
0-10 min: define the first scope
- Choose one category: laptops only, or laptops + docks.
- Confirm the naming format and asset ID pattern.
- Decide whether peripherals are standalone assets or part of a kit.
10-20 min: print and place pilot labels
- Tag 10-20 active assets.
- Keep placement consistent across similar devices.
- Record any surfaces where adhesion or scan speed looks weak.
20-30 min: verify the workflow
- Scan each tagged asset once.
- Confirm assignment, location, and naming look correct.
- Capture a short list of re-tag or rename fixes before scaling.
QR vs NFC (When to Consider NFC)
For most small IT teams, QR is the default:
- cheapest labels
- universal scanning (any phone camera)
- fast rollout
Consider NFC when:
- you need better durability
- you want tap-to-scan behavior
- the extra cost is justified
Comparison: NFC vs QR Code Tracking.
Naming Standard (So Reporting and Audits Work)
Pick a naming convention and don’t improvise.
Example:
Laptop - Dell Latitude 5440Docking Station - Dell WD19Charger - USB-C 65W
Why it matters:
- consistent reporting (asset classes)
- fewer duplicates
- faster audits
If you want to structure categories for reporting without overcomplicating it: Asset Class Segmentation for Reporting: A Practical Guide.
Verification: How Tags Stay “True”
Tags don’t solve tracking by themselves. Verification does.
Quarterly workflow:
- scan or verify assets
- reconcile mismatches (assignment/location/status)
- replace damaged labels
Checklist: IT Asset Audit Checklist (for Small IT Teams).
If you want the workflow built-in: Inventory sessions.
FAQ
Should the QR code encode all asset details?
No. Encode a stable ID and keep details in your system. It’s easier to change records than reprint labels.
What label material should we use?
Use durable labels appropriate for cleaning and wear (laminated or polyester). The exact choice depends on environment; the key is consistency and replacement cadence.
How do we handle privacy for employee assignments?
Don’t print employee info on tags. Keep assignments behind permissions. If you need role controls: Role-Based Permissions in Inventory Systems.
What’s the fastest rollout plan?
Start with laptops + docks/chargers, apply labels, import the register, then run a first verification session. Template: IT Asset Register Template (CSV).
How InvyMate Helps
InvyMate supports a tag → assignment → verification loop:
- QR labeling workflow
- assignment history
- audit-ready change logs
- inventory sessions for fast verification
Start here: Asset tracking built for small IT teams.
Related reading
- IT Asset Register Template (CSV)
- Offboarding Equipment Return Checklist
- IT Asset Audit Checklist (for Small IT Teams)
- NFC vs QR Code Tracking
- Tagging Best Practices: QR Code Placement, Durability, and Size
- IT Asset Register Excel Alternative for Small IT Teams
Methodology
- This guide was reviewed as the narrow small-team workflow page for tagging laptops, docks, chargers, and peripheral kits.
- It is meant to complement, not duplicate, the broader QR placement/material guide and the general QR tagging overview.
References
- NIST SP 800-171 Rev. 3, CM-08 System Component Inventory · NIST
- CIS Controls: Inventory and Control of Enterprise Assets · Center for Internet Security
- GS1 Digital Link Standard · GS1
FAQ
Is this the main page for QR tag materials and sizing?
No. This page is for small-team laptop and peripheral tagging workflow. Use the QR placement and durability guide when you need material, size, or cross-environment label decisions.
Should small IT teams tag chargers and docks separately?
Usually yes, unless your team can reliably manage them as a kit. The right choice depends on whether accessories are frequently reassigned or often lost during returns.
Try InvyMate
Start tracking assets with QR codes and scheduled audits.